
High end epoxy flooring
Epoxy floors built to last — no more worrying about short-lived finishes.

Want a FREE Quote Today?
Contact Us Here!
Metallic Gallery
AT CHROMELINECOATINGS
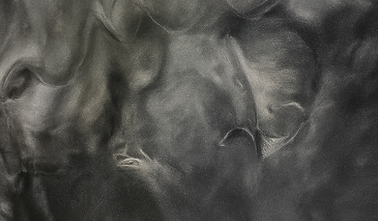
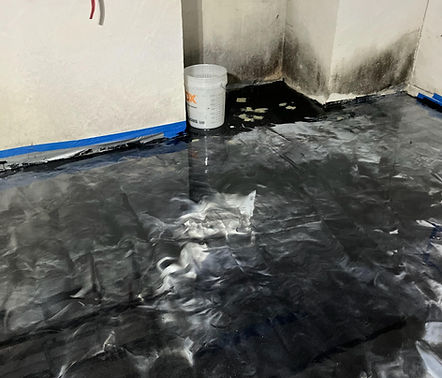
Black, White, and Grey Metallic Epoxy Floor


Gold, White, and Black Metallic Epoxy Floor


Flake Gallery
AT CHROMELINECOATINGS
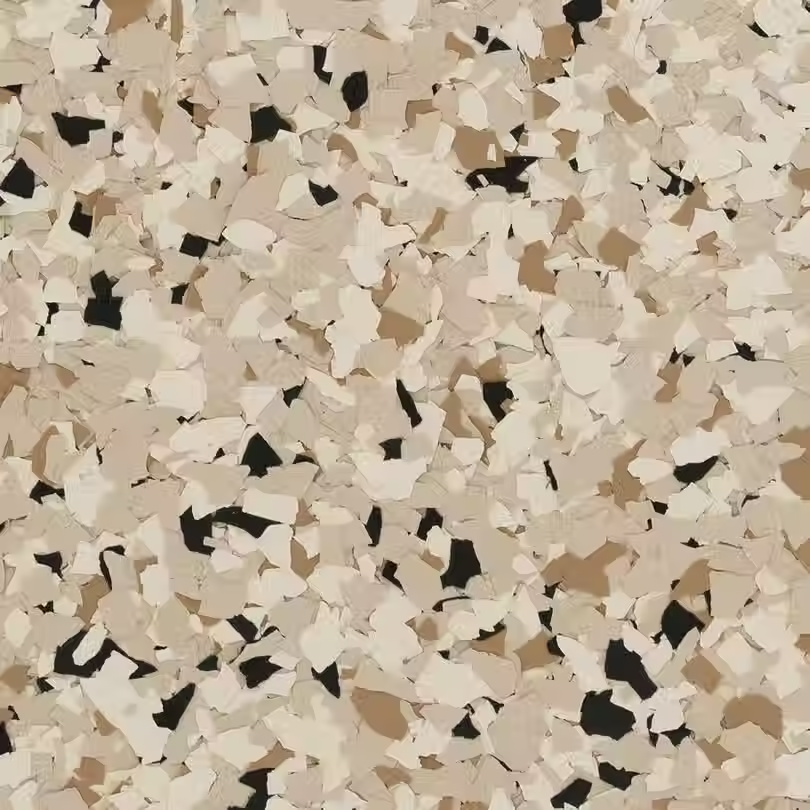
OutBack Flake Blend


What Is Epoxy?
Metallic
When selecting the right epoxy floor, it’s important to understand the options available. While many factors can influence your decision, the two primary choices are Metallic and Flake—each offering its own unique look and performance benefits. So lets break them down.
Flake

Flake Epoxy

What Is Flake Epoxy?
Flake epoxy is a durable flooring system that combines a strong epoxy base with decorative vinyl chips. The flakes add texture and color, giving the floor a clean, speckled look that’s both practical and long-lasting.

Why Choose Flake Epoxy
Flake epoxy is a dependable choice for safety and easy upkeep. Its textured surface improves slip resistance, while the coating resists stains, chemicals, and everyday wear—making it simple to maintain.

Where Flake Works Best
Flake epoxy is ideal for garages, basements, and utility spaces. It stands up to oil, salt, and moisture while keeping the area bright and functional.
Videos


Metallic Epoxy

What Is Metallic Epoxy?
Metallic epoxy blends tinted epoxy with metallic pigments to create a glossy, flowing finish. Each floor is unique, with depth and movement that look closer to marble than concrete.

Why Choose Metallic Epoxy
Metallic epoxy transforms a garage into a showroom. Its bold, high-gloss look stands out while still offering durability, stain resistance, and long-lasting protection.

Where Metallic Works Best
Perfect for garages, basements, and showcase spaces, Metallic epoxy is a favorite among car enthusiasts and homeowners who want a floor that makes a statement.
Videos


WHY CHOOSE ChromeLineCoatings
Metallic And Flake Epoxy
Hand Ground Edges
At ChromeLineCoatings, every floor is hand-ground by a trained professional to ensure a flawless foundation. Metallic epoxy is a luxury finish that highlights even the smallest imperfection, which is why our meticulous prep guarantees a smooth, elegant surface built to impress. LINK
Moisture Barriers
Moisture is the #1 threat to epoxy floors. That’s why at ChromeLineCoatings we apply a professional moisture barrier on every project—protecting your investment from bubbles, peeling, and costly failures, while ensuring a flawless, lasting finish. LINK
Thick Pour
At ChromeLineCoatings, we always pour epoxy at the proper thickness for durability and longevity. Many competitors cut corners to save on materials, but even a single millimeter too thin can shorten a floor’s lifespan by up to 40%. That’s why we never compromise on thickness—your floor deserves nothing less. LINK
Even Metallic Pigment Swirls
Many companies overlook a key step in metallic epoxy—spreading the pigments evenly. With metallic floors, every flaw shows. At ChromeLine Coatings, we ensure a perfectly balanced swirl for a flawless, luxurious finish. LINK
What
Others Do
Wrong
We Do
Right!
Applying 3 Top Coats
Most Epoxy flooring companies try to save money on materials and they will only apply one layer of top coat. But this can be very bad for the floor and cause the epoxy to wear easy and start to yellow in the sunlight but at ChromeLineCoatings we always add 3 Top Coat Layers to ensure your floor lasts for 20 years without any work being done to it. LINK
Well Timed Application
Companies throughout the US will rush jobs to just get them out the way and try and move on to the next which means they may rush the application process which can lead to cracked floors. At ChromeLineCoatings we can guarantee that your floor doesn't get rush we take our time perfecting your floor. LINK
Leveling The Floors
Leveling the floors are a crucial part of doing metallic floors. Most companies skip this which in turn lowers the life time of your floor. At ChromeLineCoatings we are able to level your floors within 1 - 2 days then we move on to the application process. LINK
Clean Floors Before Application
Not cleaning the Floors before applying the Epoxy resin can leave dust and debris which can leave imperfections in the floor. We clean every floor we touch at ChromeLineCoatings to ensure your floor never has imperfections. LINK
Exclusives
AT CHROMELINECOATINGS
Custom Anti-Slip Placement
By adding Aluminum Oxide we are able to make specific sections in your floors like high traffic areas, anti slip. Great for families with kids.
UV-Reflective TopCoat
UV-Reflective Topcoats Prolong the life of your epoxy floor. this Topcoat protects y0ur floors from UV rays. We highly recommend adding this to your floor.
Custom Embedded Logo
An embedded logo in your epoxy floor is a great choice because it makes your space stand out with a personal or professional touch. It adds style, reinforces identity, and creates a lasting impression while still maintaining the floor’s strength and durability.
Interactive LED Integration
LED Light embedded under a clear Top Coat, Adding this can highlight luxury cars, and make your floor look like non other.
Sound-Dampening Epoxy Layers
Adding sound-dampening epoxy layers opens up more ways to use your space, making it quieter and more versatile. Perfect for a home gym or workshop, it reduces noise while keeping the floor durable and comfortable.
Customizable Colors
At ChromeLineCoatings you can show colors that you would like on your floor and we are able to replicate them and put those colors on your floor Flake as well as Metallic.
Stem Walls
At ChromeLineCoatings we offer stem walls which is the material going up the wall a couple inches adding a luxury clean look to your epoxy floor.
Garage Clearing
We are able to clear your space as long as you provide us with protective material. for example tarps or a tent if you want your belongings temporarily outside. after the project we can move your things back into the garage.
Process Of Flake
AT CHROMELINECOATINGS
1. Grinding The Concrete
Grinding is the foundation of any high-quality flake epoxy floor. By mechanically grinding the surface, we remove all contaminants like dirt, oil, sealers, and old coatings, exposing the raw concrete underneath. This not only creates a perfectly smooth and level surface, but it also opens the pores of the concrete, allowing the epoxy to soak in and bond directly to the slab—rather than just sitting on top. A strong bond means better durability, resistance to peeling or bubbling, and a flawless finish that lasts for years. Skipping or rushing this step is one of the main reasons cheaper floors fail early, which is why we treat surface preparation as one of the most important parts of the entire process.
2. Vacuum Silica Dust
After grinding, the surface is covered in fine silica dust that can weaken the bond between the concrete and epoxy if not removed properly. Using powerful HEPA-filtered vacuums, we extract every trace of dust from the surface and edges, ensuring a clean, porous substrate ready to absorb the primer coat. This step isn’t just about cleanliness—it’s about creating the strongest bond possible and protecting both the finish and your indoor air quality. Removing silica dust also prevents imperfections like bubbling or uneven texture in the final floor, giving you that smooth, flawless, luxury finish.
3. Pouring Base Coat
The base coat is what locks everything together. Once the concrete is clean and prepped, we pour and roll out a high-quality epoxy base layer that soaks into the open pores of the concrete, forming a permanent chemical bond. This step isn’t just about color — it’s about strength and adhesion. A properly applied base coat seals the slab, evens out any micro-imperfections, and creates the perfect surface for the decorative flake to embed into. Skipping this step or applying it incorrectly can lead to peeling, bubbling, or uneven texture down the line, which is why we pour and spread it with precision to ensure a smooth, uniform foundation.
4. Broadcasting Flake
Once the base coat is evenly applied, we broadcast decorative flake across the entire floor until it’s fully covered. This step does more than just enhance the look — it adds real function and strength. The flake locks into the wet base coat, creating a textured surface that increases durability, hides imperfections, and provides slip resistance. It also gives the floor its signature custom look, whether that’s a sleek modern finish or a bold, high-end style. We carefully broadcast by hand to ensure every inch is evenly coated, which creates a consistent surface and sets the stage for a flawless final topcoat.
5. Scraping Flake
After the flake has fully bonded to the base coat, we scrape the entire surface to remove any loose or standing flakes. This step is critical for achieving a perfectly smooth and even finish. By scraping in multiple directions, we knock down sharp edges and high spots, which not only improves the overall look but also ensures the topcoat lays flat and bonds seamlessly. A properly scraped floor creates a more comfortable walking surface, prevents flakes from peeling up later, and gives that clean, professional texture that separates high-end floors from rushed jobs.
6. Applying Topcoat
The top coat is what seals everything together and gives the floor its final, polished look. Once the flakes are scraped and the surface is perfectly smooth, we apply a clear, UV-stable top coat that locks the entire system in place. This step adds a protective layer that’s resistant to chemicals, hot tire pickup, and everyday wear and tear. It also brings out the depth and color of the flake, giving the floor that glossy, showroom-quality finish. A properly applied top coat is what separates a standard floor from a luxury one—it’s what makes the surface easy to clean, long-lasting, and visually striking for years to come.


Process Of Metallic
AT CHROMELINECOATINGS
1. Grinding The Concrete
Every stunning metallic epoxy floor starts with flawless surface preparation. Grinding removes old coatings, sealers, and surface contaminants while opening the pores of the concrete. This allows the metallic epoxy to soak deep into the slab, creating a strong chemical bond rather than a weak surface layer. Without this step, even the best products can peel, bubble, or lift over time. A perfectly ground floor ensures the metallic finish lays down smooth, level, and built to last — setting the foundation for that high-end, mirror-like look.
2. Patching Compound
After the floor is ground and fully exposed, any cracks, divots, or imperfections are repaired using a high-strength patching compound. This step is crucial because metallic epoxy highlights the surface underneath — it doesn’t hide flaws like some other coatings might. By filling and smoothing every imperfection, we create a seamless foundation that allows the metallic design to flow cleanly without visible lines, dips, or texture breaks. Proper patching ensures the final finish looks flawless, ultra-smooth, and professionally crafted from edge to edge.
3. Applying Base Coat
The base coat acts as the anchor layer for the entire metallic epoxy system. Once the surface is smooth and repaired, we roll out a solid color base coat that seals the slab and creates a uniform background for the metallic design to build on. This layer locks down the surface, preventing outgassing and uneven absorption, which are common causes of bubbles or patchy color. A properly applied base coat ensures the metallic pigments flow evenly and the final finish has consistent depth, clarity, and a professional showroom look.
4. Sanding/Re-Patching
Once the base coat has cured, we lightly sand and inspect the entire surface to ensure it’s perfectly smooth and free of imperfections. Any small divots, pinholes, or uneven areas are carefully patched and blended. This step is critical because metallic epoxy highlights every detail — even the smallest flaw can show through the final finish. By refining the surface now, we create a flawless foundation that allows the metallic layer to flow like liquid glass, resulting in a seamless, high-end finish.
5. Dry/Acetone Mop
Once the base coat has cured, we lightly sand and inspect the entire surface to ensure it’s perfectly smooth and free of imperfections. Any small divots, pinholes, or uneven areas are carefully patched and blended. This step is critical because metallic epoxy highlights every detail — even the smallest flaw can show through the final finish. By refining the surface now, we create a flawless foundation that allows the metallic layer to flow like liquid glass, resulting in a seamless, high-end finish.
6. Pouring Epoxy
This is where precision meets artistry. Once the surface is fully prepped, we pour the metallic epoxy across the floor, allowing it to self-level while using advanced techniques like swirling, feathering, and blending to create depth and movement. This layer is what gives the floor its signature one-of-a-kind look — like liquid metal or flowing marble. Every motion matters, and our goal is to achieve a smooth, seamless design with no roller lines, uneven puddles, or streaks. A flawless pour is what transforms a clean slab of concrete into a luxury statement piece.
7. Squeegee/Roller
Once the metallic epoxy is poured, we use a squeegee and roller to evenly spread and control the flow of the material. This step is all about precision — it ensures the coating levels out perfectly and eliminates any uneven buildup or thin spots. By guiding the resin smoothly, we create consistent depth and movement in the metallic design while maintaining a uniform thickness across the entire floor. A proper squeegee and backroll technique is key to achieving that flawless, glassy finish that high-end metallic floors are known for.
8. Top Coat Application
The top coat is the protective shield that locks everything in. After the metallic layer has cured to perfection, we apply a high-performance, UV-stable top coat that seals the surface and adds exceptional durability. This step is what protects the floor from chemicals, tire marks, scratches, and daily wear — all while enhancing the depth and shine of the metallic finish beneath. A professionally applied top coat creates a slick, glass-like surface that’s easy to clean, slip-resistant, and built to last for years. It’s the final layer that turns a beautiful floor into a true showroom masterpiece.

.jpg)
.jpg)
.jpg)
.jpg)
.jpg)
.jpg)
.jpg)
Flake Blends
AT CHROMELINECOATINGS
Customer Favorites

Royal Cobalt, Space Black, Polar White

Obsidian Black, Frosted Pearl, Silver Mist

Ash Granite, Storm Grey, Lunar Charcoal

Midnight Onyx, Shadow Steel, Moonlit Slate

Pebbled Silver, CloudStone Grey, Arctic Frost

Sand Dune Beige, Driftwood Tan, Bone White

Riverstone Grey, Glacier White, Smoky Quartz

Mocha Clay, Autumn Chestnut, Chalk White

Dusty Taupe, EarthStone Brown, Whisper Grey
Golden Sand, Ivory Cream, Warm SandStone

Canyon Bronze, Terracotta Clay, Alabaster White

Ocean Slate, Fog Silver, Mist Blue
Need More Options?
Our Community Testimonials
AT CHROMELINECOATINGS
Abdul Rafay
(Owner, Grime Reapers Luxury Auto Detailing)
“I had Henry and his team at ChromeLine Coatings do a metallic epoxy floor in my garage, and honestly, I was blown away. Henry really knows what he’s doing — he took the time to explain everything and made sure it came out perfect. The floor looks insane in person, like something you’d see in a luxury showroom. Everyone who comes over asks about it. You can tell he cares about the details and actually takes pride in his work. Couldn’t recommend him enough.”
Grant Catstevens
(Executive at DuPage Aerospace Private Jet Charter and Maintenance)
“I had Henry and his crew from ChromeLine Coatings do a full flake epoxy floor in my garage, and I honestly couldn’t be happier. From start to finish, the communication was great — Henry showed up on time, explained every step, and made sure I knew what to expect. The attention to detail was next-level. The floor has that perfect clean, high-end look, and it completely changed the feel of my garage. It’s bright, easy to clean, and looks like something you’d see in a car showroom. Henry runs his business the right way — professional, honest, and passionate about his work.”
Kyle Gariess
(Owner, Axel Luxury Exotic And Luxury Car Rental Chicago)
“I had ChromeLine Coatings install metallic epoxy throughout my penthouse, and the results are unreal. Henry and his team went above and beyond from start to finish — professional, detail-oriented, and genuinely passionate about their work. The floors have this deep, glass-like shine that shifts with the light and completely transforms the space. It gives my home that modern, luxury look I was going for. Every guest who walks in immediately asks who did the floors. Henry treated the job like it was his own place — you can tell he really cares about the final product. I’d recommend him to anyone who wants a high-end finish done the right way.”
FREQUENTLY ASKED QUESTIONS
AT CHROMELINECOATINGS
How Long Do 1-2 Car Garages Take?
Most standard 2–3 car garages can be completed in just 1–2 days depending on the system you choose. Premium polyaspartic systems allow for same-day installation, while traditional epoxy may require extra curing time. We pride ourselves on efficient scheduling without ever cutting corners.
What’s the difference between epoxy and polyaspartic coatings?
Epoxy is a durable, budget-friendly option with excellent protection. Polyaspartic is the luxury upgrade — faster curing, more UV resistant, and longer lasting. Both are excellent; we’ll help match the right system to your needs.
Will I need to clear out my entire garage before installation?
Yes — the floor must be completely cleared to ensure a perfect, seamless finish. If needed, we also offer a “Garage Clear-Out” service to make this process effortless for you.
Do you move heavy items or help with clearing out the garage?
Absolutely. For clients who prefer a hands-off experience, our team can carefully move and store your garage items temporarily. This is part of our exclusive service package for a smoother installation day.
How much does it cost to epoxy a standard 2-car garage?
Can you install epoxy in cold weather?
Pricing depends on the system, square footage, and design, but most 2-car garages start between $2,000–$6,000. Every floor is a custom project designed to add value to your home.
Yes — we install year-round. Our cold-weather formulas and portable heating solutions allow us to work even in Midwest winters.
What factors affect the price of my epoxy floor?
Square footage, existing concrete condition, customization level, and coating type all play a role. We provide transparent, all-inclusive quotes with no hidden fees.
What happens if my floor has cracks or moisture issues?
No problem. We repair cracks, fill expansion joints, and apply moisture barriers when needed. Our goal is a floor that looks stunning and performs flawlessly long term.
What if I already have an epoxy or paint coating on my garage floor?
No problem at all — we specialize in removing and replacing old coatings. Whether it’s peeling paint, a DIY epoxy kit, or a worn-out professional job, we can bring your floor back to life with a clean, modern, and ultra-durable finish.
About Us
Welcome To The Family:
At ChromeLineCoatings, we believe every garage deserves more than just a floor — it deserves a statement piece. What started as a small, family-driven vision has grown into a trusted name in luxury flooring, with over 250+ stunning floors crafted to perfection. Our team treats every project like it’s our own home, creating a warm, personal experience that clients can truly feel. Beyond the shine and durability, our promise is built on trust, connection, and craftsmanship. When you choose ChromeLineCoatings, you’re not just upgrading your floor — you’re joining a family dedicated to elevating your space with care, precision, and timeless style.
